What you need:
Entity
My Edited Plugins
My Machs
It is not needed with my tut, however as Neodos stated, it can be important to know the difference between PHMO and Coll.
Remember it like this,
Collision is bullet/grenade collision. Remember the bullet collides.
PHMO(Physics Model) is physical collision, basically anything but bullets and grenades.
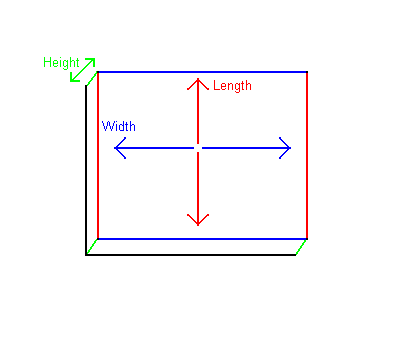
Now, This tutorial will be for making various rectangles only.
The first step is to pick the size you would like your rectangle, it can be any combo of AxBxC(lengthxwidthxheight). The Machines included come 30x30x1.(I know it says 15x15x1 on the mach, etc, Its a typo ignore it.)Write this number down as AxBxC=00x00X00 (Your Numbers replacing the 0's of course.)
Secondly comes collision. Using My plugins Coll, Mode, And PHMO have been chopped up to only show you what you need. Making this very easy.
Go to the Collision tag, (Mine is scenarios\objects\multi\yamagushi\game15x15x1wall\game15x15x1wall)
Click on the scroll down bar under "Planes" Select the Cooresponding Number, and Simply Fill in the info as instructed below;
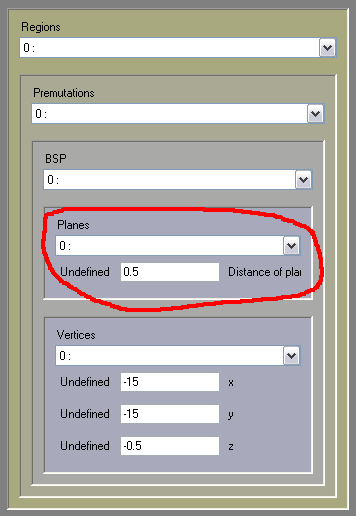
Plane 0:
Distance of the plane from the center. = 1/2C
Plane 1:
Distance of the plane from the center. = 1/2C
Plane 2:
Distance of the plane from the center. = 1/2B
Plane 3:
Distance of the plane from the center. = 1/2A
Plane 4:
Distance of the plane from the center. = 1/2B
Plane 5:
Distance of the plane from the center. = 1/2A
Now for the next part of Collision.
All you need to do is click on the scroll down bar under "Vertices" Select the Cooresponding Number, and Simply Fill in the info as instructed below(Make sure to get the positives and negatives right);
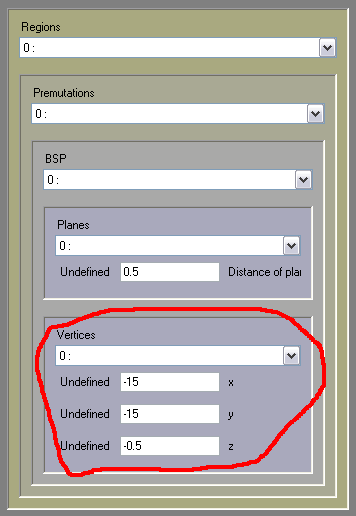
Vertice 0:
x = -1/2A
y = -1/2B
z = -1/2C
Click Save
Vertice 1:
x = -1/2A
y = 1/2B
z = -1/2C
Click Save
Vertice 2:
x = 1/2A
y = 1/2B
z = -1/2C
Click Save
Vertice 3:
x = 1/2A
y = -1/2B
z = -1/2C
Click Save
Vertice 4:
x = -1/2A
y = -1/2B
z = 1/2C
Click Save
Vertice 5:
x = 1/2A
y = -1/2B
z = 1/2C
Click Save
Vertice 6:
x = 1/2A
y = 1/2B
z = 1/2c
Click Save
Vertice 7:
x = -1/2A
y = 1/2B
z = 1/2c
Click Save
Great, Your now done with your new collision. The hard part is over.
Next we will do Mode. Go to the Mode Tag, (Mine is scenarios\objects\multi\yamagushi\ingame15x15x1wall\ingame15x15x1wall)
Fill in the following info(Make sure to get the positives and negatives right.);
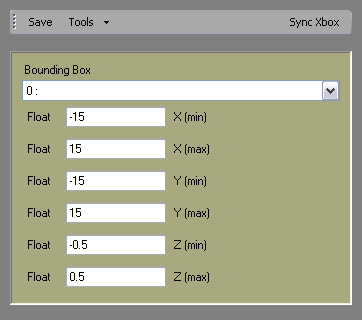
X(min) = - 1/2A
X(max) = 1/2A
Y(min) = -1/2B
Y(max) = 1/2B
Z(min) = -1/2C
Z(max) = 1/2C
Click Save
Done, Now for the last part PHMO. Go to the PHMO Tag, (Mine is scenarios\objects\multi\yamagushi\game15x15x1wall\game15x15x1wall)
Fill in the following info;
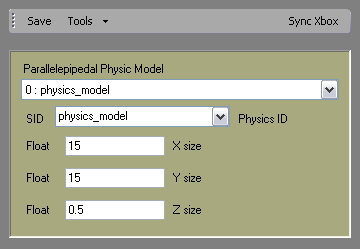
X = 1/2A
Y = 1/2B
Z = 1/2C
Click Save
Thats it. I've made it that fricken easy. Enjoy. =D
One problem that some have is this new mach wont show up on the sbsp viewer.
As an added aid, included in the download is scenarios\objects\multi\yamagushi\sbsp15x15x1wall\sbsp15x15x1wall. This is a "Dummy" file, simply go to its Mode and enter the same info you did above for the Mode step. Once done swap to this mach to see what your doing then swap it back to the other for in game.
I was pretty tired when I made this tut, so if anyone spots any issues be sure to post it here so I can correct it.
Thanks to Neodos for the original research/tutorial/plugins.
Plugins and Tags download:
http://www.megaupload.com/?d=HTZ5S0V0